Certified Snow Blowers Startup Procedure
![]() Updated
by
Juan Velez
Updated
by
Juan Velez
This information covers the following Certified snow blowers: 060-3732-6 (100435) 22", 060-3740-6 (100566) 24", 060-3742-2 (100567) 27", and 060-3744-8 (100568) 30."
Please read the instructions carefully and completely before performing the service.
SAFETY PRECAUTIONS
- To reduce the risk of injury, the user must read and understand the operator's manual before using this product.
- DO NOT make any adjustments to the snowblower without first stopping the engine, removing the engine key, and disconnecting the spark plug wire.
- Burns from hot parts - let the engine cool for 30 minutes before touching hot parts.
- Injury from moving parts - this machine may pick up and throw objects which can cause serious personal injury. Keep bystanders at a safe distance.
- To reduce the possibility of fire or explosion, be careful when working around gasoline. Keep cigarettes, sparks, and flames away from all fuel-related parts.
- DO NOT run the engine with the belt guard removed.
Startup for the 22" model
- Make sure the engine safety key is inserted into the key hole.
- Move the fuel valve lever to the "ON" position (lever to the right).
- Move the choke lever depending on the engine temperature: A) To start a cold engine, move the choke to the full choke position (lever to the left). B) To start a warm engine, leave it in the run position (lever to the right).
- Move the throttle lever to its full speed position (picture of a rabbit - left) to the start the engine.
- Press the primer bulb to prime the gas depending on the engine's temperature: A) To start a cold engine, press the primer bulb 3-5 times. B) To start a warm engine, DO NOT PRIME.
- Use the electric start or manual recoil, once the unit starts, and let it run in the choke position for a brief period. Follow this by putting the lever into the run position (lever to the left).
Visual
See below.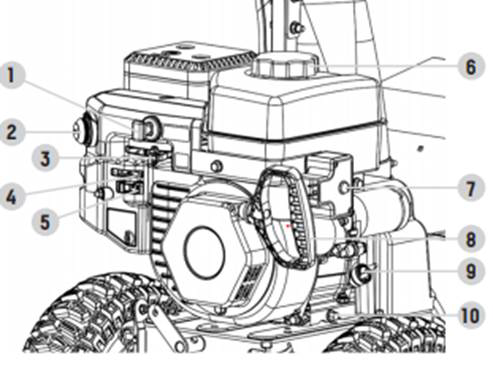
Startup for the 24", 27", and 30" models
- Make sure the engine safety key is inserted into the key hole.
- Move the fuel lever to the "ON" position (turn the dial clockwise).
- Turn the choke dial counterclockwise depending on the engine temperature: A) To start a cold engine, move the choke to the full choke position. B) To start a warm engine, leave it in the run position.
- Move the throttle lever to the full speed position (picture of a rabbit, left) to start the engine.
- Press the primer bulb to prime the gas depending on the engine's temperature: A) To start a cold engine, press the primer bulb 3-5 times. B) To start a warm engine, DO NOT PRIME.
- Use the electric start or manual recoil, once the unit starts, and let it run in the choke position for a brief period. Following this, put the lever into the run position (lever to the left).
Visual
See below.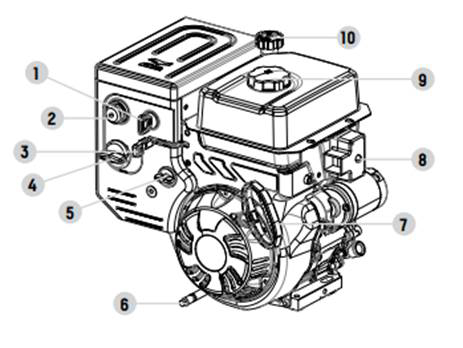
If the unit fails to start, check its oil lever
- Disconnect the yellow wire below the electric start assembly (same as our generators); this will reset the sensor if it is tripped. Should the unit start, this means there is insufficient oil in the unit and needs to be rechecked. Lastly, reconnect the yellow wire.
- Disconnect the black wire located below the electric start assembly (same as our generators); this will bypass the diode and ensure continuous spark to the ignition coil. Try starting it, and if the unit powers on, let it run briefly and reconnect the black wire. If the unit fails, the diode is bad.
- Disconnect the spark plug boot from the spark plug. Insert a Robertson screwdriver into the spark plug boot. Holding the screwdriver handle to avoid a shock when starting, place the metal shaft of the screw driver close to the overhead valve (OHV) cover and engage the start to see if the spark jumps from screwdriver to the valve cover. If the spark does not jump, check to ensure that the ignition coil is not damaged. Ensure that it is tightly attached to the wire. If it is, then the ignition coil may be faulty. If there is spark, then proceed by checking for any possible spark plug defects/failures (possibly cracked or damaged due to shipping).