Basic Service Information for Champion Engines 196cc and above.
This bulletin covers the following Champion Power Equipment models: Champion Engines of 196cc and above. Read the instructions carefully and completely before performing this service. SAFETY PRECAUTI…
This bulletin covers the following Champion Power Equipment models: Champion Engines of 196cc and above.
- To reduce the risk of injury, user must read and understand the operator’s manual before using this product.
- DO NOT make any adjustments to the product without first stopping the engine and disconnecting the spark plug wire.
- Burns from hot parts — let the engine cool completely before touching hot parts.
- Injury from moving parts
- To reduce the possibility of fire or explosion, be careful when working around gasoline. Keep cigarettes, sparks and flames away from all fuel‐related parts.
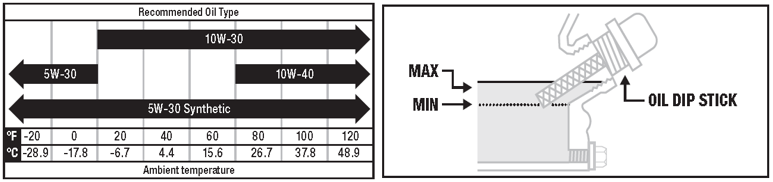
Change the oil when the engine is warm. Refer to the following chat to select the proper grade of oil for your operating environment.
Visual
- Remove the oil drain plug with a 15 mm socket and extension.
- Allow the oil to drain completely.
- Replace the drain plug.
- Remove the oil fill cap/dipstick to add oil.
- Add the correct amount of oil and replace the oil fill cap/dipstick.
- Dispose of the used oil at an approved waste management facility.
Intermittent use (less that one hour/month) or colder temperatures (below 60 degrees F) NGK BPR6ES or equivalent
Moderate use (less than 3 hours/month) or seasonal temperatures (50-80 degrees F) NGK BPR7ES or equivalent
Extreme use (conditions) or hot climates (80-100 degrees F) NGK BPR8ES or equivalent
- Remove the spark plug cable from the spark plug.
- Use the spark plug tool that shipped with your generator to remove the plug.
- Inspect the electrode on the plug. It must be clean and not worn to produce the spark require for ignition.
- Make certain the speak plug gap is 0.7-0.8 mm (0.028-0.031 in.).
- Refer to the spark plug recommendation chart when replacing the plug.
- Carefully thread the plug into the engine.
- Use the spark plug tool to firmly install the plug.
- Attach the spark plug wire to the plug.
- Remove the snap-on cover holding the air filter to the assembly.
- Remove the foam element.
- Wash it in liquid detergent and water. Squeeze thoroughly dry in a clean cloth.
- Saturate in engine oil.
- Squeeze in a clean absorbent cloth to remove all excess oil.
- Place the filter in the assembly.
- Reattach the air filter cover and snap it back into place.
- Allow the engine to cool completely before servicing the spark arrester.
- Remove the two screws holding the cover plate which retains the end of the spark arrester to the muffler.
- Remove the spark arrester screen.
- Carefully remove the carbon deposits from the spark arrester screen with a wire brush.
- Replace the spark arrester if it is damaged.
- Position the spark arrester in the muffler and attach it with the two screws.
Use a damp cloth to clean the exterior surfaces of the engine. Use a soft bristle brush to remove dirt and oil. Use an air compressor (25 PSI) to clear dirt and debris from the engine. Inspect all the air vents and cooling slots to ensure that they are clean and unobstructed.
The air-fuel mixture is not adjustable. Tampering with the governor can damage your generator and your electrical devices and will void your warranty. CPE recommends that you contact our service line at 1-877-338-0999 for all other service and/or adjustment needs.
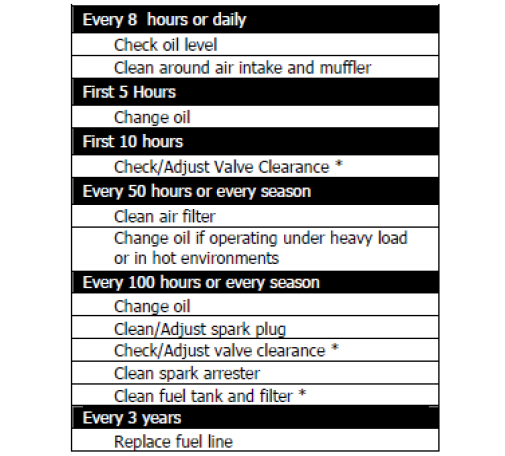
Follow the service intervals indicated in the following schedule:
Visual
View and download the PDF version here.
How did we do?
Spark Plug Specifications: OEM vs. Replacement Types
Checking for Specifications in the Owner's Manual