HSB Generator Preventative Maintenance: Switch, Low Oil Shut-Down 0.6 Bar
CPETB10020008 This bulletin covers the following models: All 12.5 and 14kW Home Standby Generators. (Maintenance of part no. 100831 Low Oil Shut-Down Switch 0.6 Bar.) Please read instructions careful…
Updated
by Juan Velez
CPETB10020008
This bulletin covers the following models: All 12.5 and 14kW Home Standby Generators. (Maintenance of part no. 100831 Low Oil Shut-Down Switch 0.6 Bar.)
Please read instructions carefully and completely before performing service.
SAFETY PRECAUTIONS
- To reduce the risk of injury, user must read and understand the operator’s manual before using this product.
- DO NOT make any adjustments to the generator without first stopping the engine and disconnecting the spark plug wire.
- Burns from hot parts — let the engine cool completely before touching hot parts.
- Injury from moving parts
- To reduce the possibility of fire or explosion, be careful when working around gasoline. Keep cigarettes, sparks and flames away from all fuel‐related parts.
Home standby generators installed in high humidity regions have experienced low oil faults and starting issues due to corrosion of the lowo oil shut-down switch. In some regions, the combination of humidity and salt can penetrate the sensor tab vent, and the plastic-metal seam of the low oil shut-down switch causing corrosion to the pressure spring inside of the switch.
Preventative maintenance is also recommended for all HSB generators.
Visual
See below.
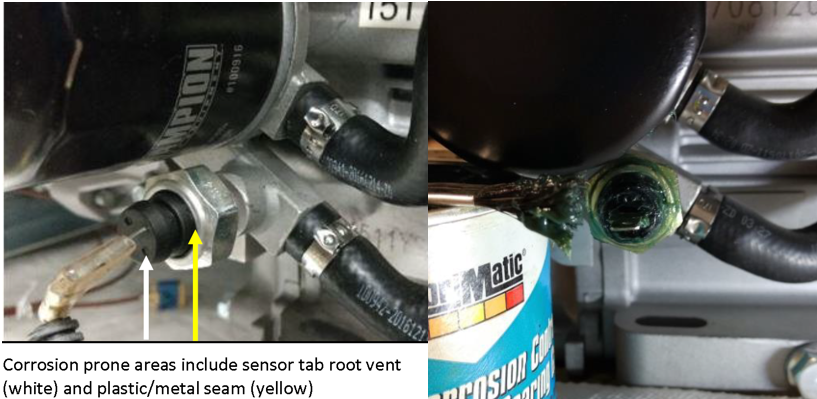
- Locate the low oil shut-down switch.
- Location is to the right of the oil filter next to the oil cooler hoses.
- Clean the low oil shut-down switch.
- Remove the yellow wire from the low oil shut-down switch sensor tab.
- Use soapy water and a paint brush to clean all the plastic and metal surfaces.
- Work the brush into the plastic/metal seam to remove all dust and dirt.
- Rinse off the low oil shut-down switch.
- Use a clean spray bottle full of clean water to rinse off the low oil shut-down switch.
- Use the fine spray setting to spray the plastic/metal seam area.
- Dry the low oil shut-down switch.
- Using a clean cloth, dry off the low oil shut-down switch.
- Use compressed air or a hair dryer to blow (if applicable).
- Apply grease to the low oil shut-down switch.
- Use a small brush.
- Work the grease into the plastic/metal seam of the switch.
- Brush the entire switch and sensor tab with grease.
- Reconnect the yellow wire to the low oil shut-down sensor tab.
Maintenance Completed
Recommended grease
- Non-conducting grease
- Dielectric grease.
View and download the PDF version here.
How did we do?
How to Replace a Blown Fuse